
We've previously covered the basics of driving OLED I2C displays from MicroPython, including simple graphics commands and text. Here we look at displaying monochrome 1 bit-per-pixel images and animations using MicroPython on a Wemos D1.
Processing the images and correct choice of image-formats is important to get the most detail, and to not run out of memory.
| Requirements | |||
|---|---|---|---|
| Wemos D1 v2.2+ or good imitations. | amazon | ||
| 0.96in OLED Screen 128x64 pixels, I2c interface. | amazon | ||
| Breadboard Any size will do. | amazon | ||
| Wires Loose ends, or jumper leads. | |||
Setting up
The display communicates over I2C, but we need a driver to interface with it.
For this we can use the ssd1306 module for OLED displays available
in the MicroPython repository.
Click Raw format and save the file with a .py extension.
You can then use the ampy tool (or the WebREPL) to upload the file to your device's filesystem:
ampy --port /dev/tty.wchusbserial141120 put ssd1306.py
With the ssd1306.py file on your Wemos D1, you can import it as any other Python module. Connect to your device,
and then in the REPL enter:
from machine import I2C, Pin
import ssd1306
import framebuf
If the import ssd1306 succeeds, the package is correctly uploaded and you're good to go.
Wire up the OLED display, connecting pins D1 to SCL and D2 to SDA.
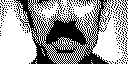
Provide power from G and 5V. The display below is a 2-colour version, where the top 1/4 of the pixels are yellow, while the rest is blue. They're intended for mobile screens, but it looks kind of neat with Scatman.
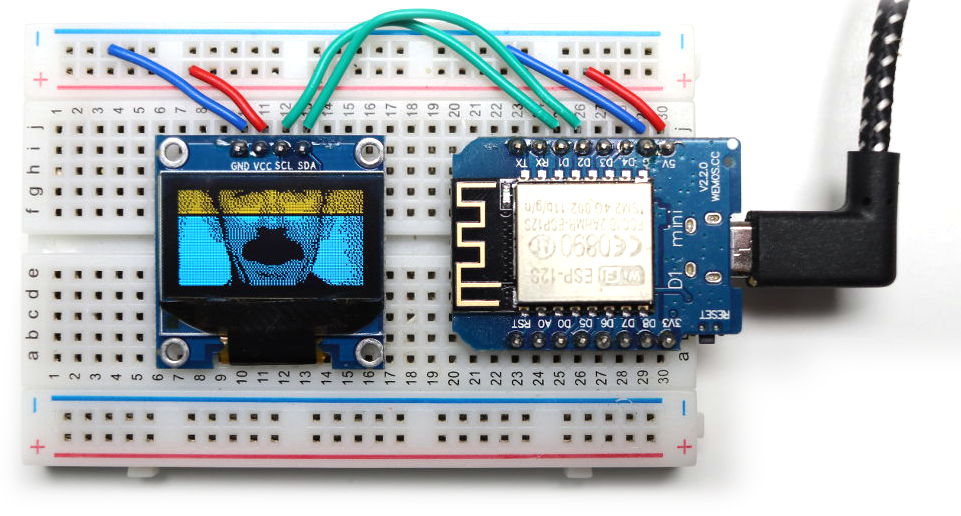
i2c = I2C(-1, Pin(5), Pin(4))
display = ssd1306.SSD1306_I2C(128, 64, i2c)
If your display is a different size just fiddle the numbers above. You'll need to change some parameters on loops later too.
To test the display is working, let's set all the pixels to on and show it.
display.fill(1)
display.show()
The screen should light up completely. If it doesn't, something is wrong.
Image Processing
To display an image on a 1-bit per pixel monochrome display we need to get our image into the same format. The best way to do this is using image manipulation software, such as Photoshop or GIMP. These allow you to down-sample the image to monochrome while maintaining detail by adding dither or other adjustments.
The first step is to crop the image down to the correct dimensions — the display used here is 128x64 pixels. To preserve as much of the image as possible you might find it useful to resize the larger axis to the max (e.g. if the image is wider than high, resize the width to 128 pixels). Then crop the remaining axis.
You can convert images to 1-bit-per-pixel in GIMP through the Image -> Mode -> Indexed... dialog.
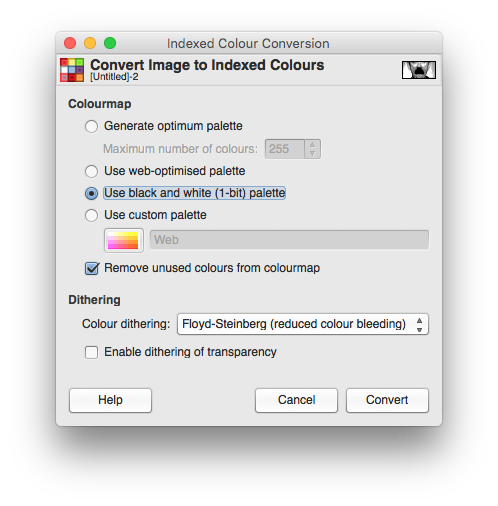
If you're image is already in an indexed format this won't be available. So convert back to RGB/Grayscale first, then re-select Image -> Mode -> Indexed.
Select "Use black and white (1-bit) palette" to enable 1bpp mode. The colour dithering settings are best chosen by trial and error depending on the image being converted although turning off dithering entirely is often best for images of solid colour blocks (e.g. logos).
Once the imagine is converted to black & white you can save to file. There are two good options for saving 1bpp images — PBM and PGM. PBM is a 1 bit-per-pixel format, while PGM is grayscale 1 byte per pixel.
| Type | Magic number (ASCII) | Magic number (Binary) | Extension | Colors |
|---|---|---|---|---|
| Portable BitMap | P1 | P4 | .pbm | 0–1 (white & black) |
| Portable GrayMap | P2 | P5 | .pgm | 0–255 (gray scale) |
| Portable PixMap | P3 | P6 | .ppm | 0–255 (RGB) |
While PBM is clearly better suited, we can pre-process PGM down to an equivalent bit stream. Both approaches are included here, in case your software can only produce one or the other.
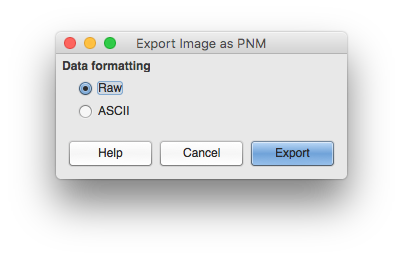
Save as either PBM (recommended) or PGM, and select Raw mode, not ASCII.
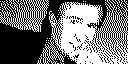
Example images
Some example images (128x64 pixels) are shown below, in PNG format. Each of the images is available in this zip which contains PBM, PGM and PNG formats.


To support developers in [[ countryRegion ]] I give a [[ localizedDiscount[couponCode] ]]% discount on all books and courses.
[[ activeDiscount.description ]] I'm giving a [[ activeDiscount.discount ]]% discount on all books and courses.
Portable Bitmap Format
Portable Bitmap Format (PBM) format consists of a regular header, separated by newlines, then the image data. The header starts with a magic number indicating the image format and whether the format is ASCII for binary. In all examples here we're using binary since it's more compact. The second line is a comment, which is usually the program used to create it. Third are the image dimensions. Then, following a final newline, you get the image binary blob.
P4
# CREATOR: GIMP PNM Filter Version 1.1
128 64
<data>
The data is stored as a 1-bit-per-pixel stream, with pixel on as 1 pixel off as 0. On a normal display screen an on pixel appears as black — this is different on the OLED, which we need to account for later.
To upload your PBM file to the controller —
ampy --port /dev/tty.wchusbserial141120 put alan.pbm
Loading images
The PBM data stream is already in the correct format for use. We can wrap the data in bytearray, use this to create a FrameBuffer and blit it immediately. However, we need to skip the header region (3x readline) before reading the subsequent data block.
with open('scatman.pbm', 'rb') as f:
    f.readline() # Magic number
    f.readline() # Creator comment
    f.readline() # Dimensions
    data = bytearray(f.read())
fbuf = framebuf.FrameBuffer(data, 128, 64, framebuf.MONO_HLSB)
We can't use readlines() since the binary image data may contain ASCII code 13 (newline).
The framebuf.MONO_HLSB format is desribed in the MicroPython docs as —
Monochrome (1-bit) color format This defines a mapping where the bits in a byte are horizontally mapped. Each byte occupies 8 horizontal pixels with bit 0 being the leftmost. Subsequent bytes appear at successive horizontal locations until the rightmost edge is reached. Further bytes are rendered on the next row, one pixel lower.
This matches exactly with the format of our PBM data.
This framebuffer format framebuf.MONO_HLSB used is different to that used by the ssd1306 screen (framebuf.MONO_VLSB). This is handled transparently by the framebuffer when blitting.
Displaying an image
We have the image data in fbuf, which can be blitted directly to our display framebuffer, using .blit. This accepts coordinates at which to blit. Because the OLED screen displays inverse (on = light, off = black) we need to switch .invert(1) on the display.
display.invert(1)
display.blit(fbuf, 0, 0)
display.show()
Portable Graymap Format
Portable Graymap Format (PGM) format shares a similar header to PBM, again newline separated. However, there is an additional 4th header line which contains the max value — indicating the number of values between black and white. Black is again zero, max (255 here) is white.
P5
# CREATOR: GIMP PNM Filter Version 1.1
128 64
255
<data>
The format uses 1 byte per pixel. This is 8x too many for our purposes, but we can process it down to 1bpp. Since we're saving a mono image each pixel will contain either 0 (fully off) or 255 (fully on).
To upload your PGM file to the controller —
ampy --port /dev/tty.wchusbserial141120 put alan.pgm
Loading images
Since each pixel is a single byte it is easy to iterate, though slow as hell. We opt here to turn on bright pixels, which gives us the correct output without switching the display invert on.
with open('alan.pgm', 'rb') as f:
    f.readline() # Magic number
    f.readline() # Creator comment
    f.readline() # Dimensions
    data = bytearray(f.read())

for x in range(128):
    for y in range(32):
        c = data[x + y*128]
        display.pixel(x, y, 1 if c == 255 else 0)
Packing bits
Using 1 byte per pixel wastes 7 bits which is not great, and iterating to draw the pixels is slow. If we pack the bits we can blit as we did with PBM. To do this we simply iterate over the PGM image data in blocks of 8 (8 bits=1 byte).
Each iteration we create our zero'd-byte (an int of 0). As we iterate over the 8 bits, we add 2**(7-n) if that bit should be set to on. The first byte we hit sets the topmost bit, which has a value of 2**(7-0) = 2**7 = 128, the second 2**(7-1) = 2**6 = 64. The table below shows the values for each bit in a byte.
|7| 6|5|4|3|2|1|0
|:--|:--|:--|:--|:--|:--|:--|:--|
|2^7|   2^6|2^5|2^4|2^3|2^2|2^1|2^0|
|128|   64|32|16|8|4|2|1|
The result is a single byte with a single bit set in turn for each byte we iterated over.
p = []
for i in range(0, len(d), 8):
    byte = 0
    for n, bit in enumerate(d[i:i+8]):
        byte += 2**(7-n) if bit == 255 else 0

    p.append(byte)
We choose to interpret the 255 values as on (the opposite as in PBM where black = on, giving an inverted image). You could of course reverse it.
The variable p now contains a list of int values in the range 0-255 (bytes). We can cast this to a bytearray and then use this create our FrameBuffer object.
# Create a framebuffer object
fbuf = framebuf.FrameBuffer(bytearray(p), 128, 64, framebuf.MONO_HLSB)
The framebuf.MONO_HLSB format is desribed in the MicroPython docs as —
Monochrome (1-bit) color format This defines a mapping where the bits in a byte are horizontally mapped. Each byte occupies 8 horizontal pixels with bit 0 being the leftmost. Subsequent bytes appear at successive horizontal locations until the rightmost edge is reached. Further bytes are rendered on the next row, one pixel lower.
This matches exactly with the format of our PGM (and bit-packed) data.
This framebuffer format framebuf.MONO_HLSB used is different to that used by the ssd1306 screen (framebuf.MONO_VLSB). This is handled transparently by the framebuffer when blitting.
Packing script
A command-line packing script is given below (and you can download it here), which can be used to pack a PGM into a 1bpp bitstream. The script accepts a single filename of a PGM file to process, and outputs the resulting packed bit data as <filename>.bin.
import os
import sys

fn = sys.argv[1]

with open(fn, 'rb') as f:
    f.readline() # Magic number
    f.readline() # Creator comment
    f.readline() # Dimensions
    f.readline() # Max value, 255
    data = bytearray(f.read())

p = []
for i in range(0, len(data), 8):
    byte = 0
    for n, bit in enumerate(data[i:i+8]):
        byte += 2**(7-n) if bit == 255 else 0

    p.append(byte)

b = bytearray(p)

basename, _ = os.path.splitext(fn)
with open('%s.bin' % basename, 'wb') as f:
    f.write(b)
The resulting file is 1KB in size, and identical to a .pbm format file, minus the header and with colours inverted (this makes display simpler).
python pack.py scatman.1.pgm

ls -l

-rw-r--r--  1 martin  staff  1024 26 Aug 18:11 scatman.bin
-rw-r--r--  1 martin  staff  8245 26 Aug 18:02 scatman.pgm
To upload your BIN file to the controller —
ampy --port /dev/tty.wchusbserial141120 put scatman.bin
Loading images
Since we've stripped off the PGM header, the resulting file can be read directly into a bytearray.
with open('scatman.bin', 'rb') as f:
    data = bytearray(f.read())

fbuf = framebuf.FrameBuffer(data, 128, 64, framebuf.MONO_HLSB)
The colours were inverted in our bit packer so we can just blit the framebuffer directly without inverting the display.
display.blit(fbuf, 0, 0)
display.show()
Animation
Both the PBM and PGM images are 1KB in memory once loaded, leaving us plenty of space to load multiple images and animate them. The following loads a series of Scatman John PBM images and animates them in a loop.
from machine import I2C, Pin
import ssd1306
import time
import framebuf

i2c = I2C(-1, Pin(5), Pin(4))
display = ssd1306.SSD1306_I2C(128, 64, i2c)

images = []
for n in range(1,7):
    with open('scatman.%s.pbm' % n, 'rb') as f:
        f.readline() # Magic number
        f.readline() # Creator comment
        f.readline() # Dimensions
        data = bytearray(f.read())
    fbuf = framebuf.FrameBuffer(data, 128, 64, framebuf.MONO_HLSB)
    images.append(fbuf)

display.invert(1)
while True:
    for i in images:
        display.blit(i, 0, 0)
        display.show()
        time.sleep(0.1)
The resulting animation —

The image distortion is due to frame rate mismatch with the camera and won't be visible in person.
Optimization
There is still plenty of room left for optimization. For static images there are often multiple consecutive blocks of bits of the same colour (think backround regions) or regular patterns (dithering). By setting aside a few bits as repeat markers we could compress these regions down to a single pattern, at the cost of random larger files for very random images and unpacking time.
We could get away with a lot less data for the animation (particularly the example above) by storing only frame deltas (changes), and using key frames. But we'd also need masking, and that takes memory... and yeah. Let's not, for now.
Create GUI Applications with Python & Qt6 by Martin Fitzpatrick — (PyQt6 Edition) The hands-on guide to making apps with Python — Over 10,000 copies sold!